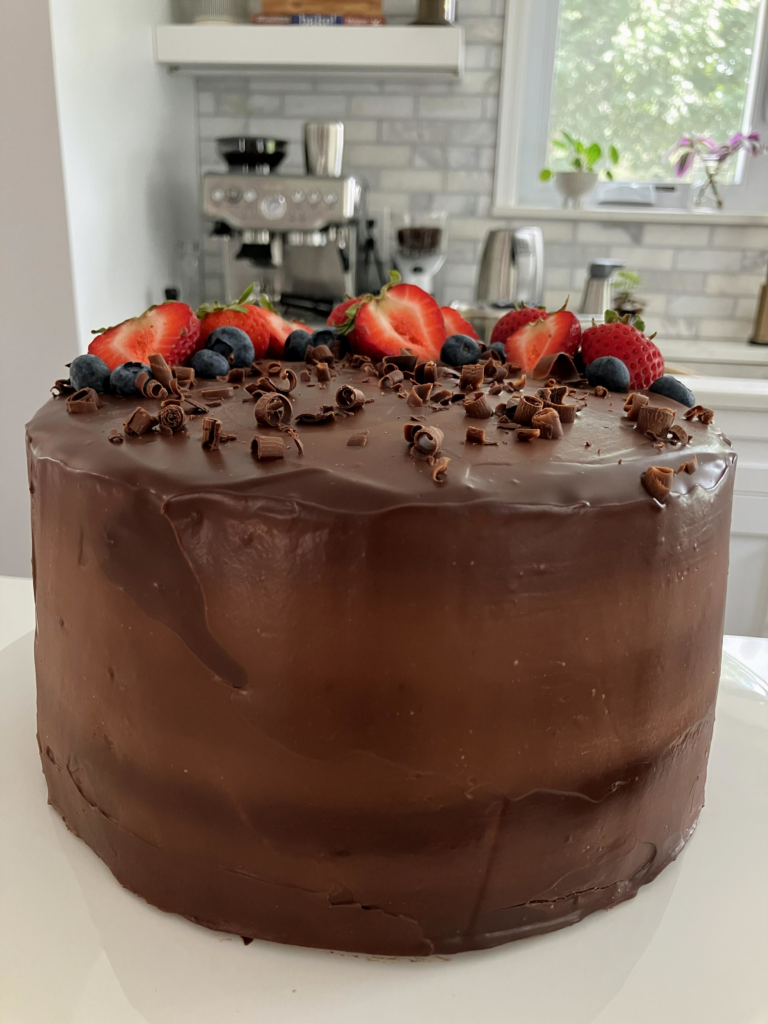
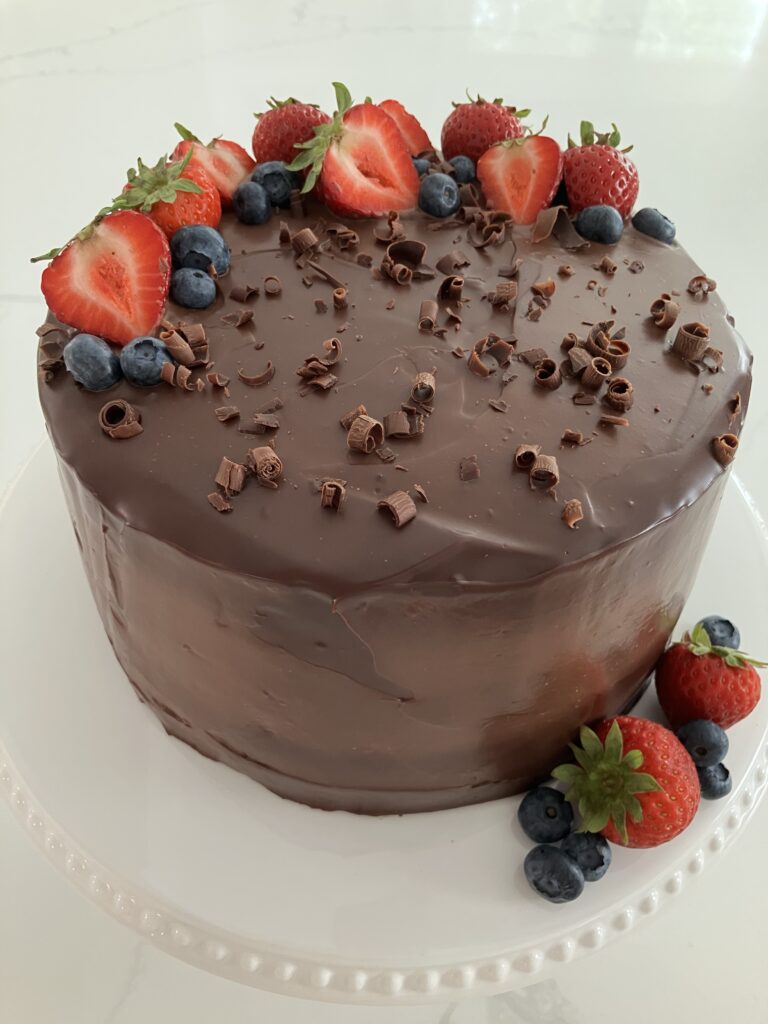
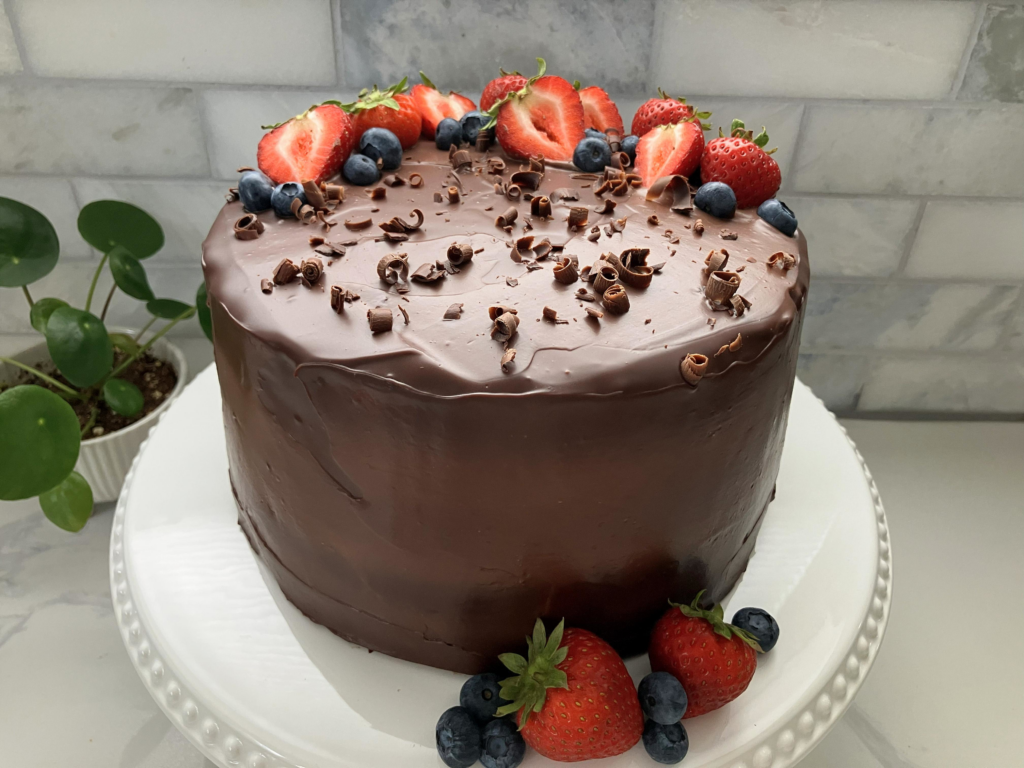
Perfectly balanced chocolate cake with layers of dark chocolate mousse covered with chocolate ganche. This just might be the most delicious chocolate cake you’ll ever taste.
This cake is one of my all-time favorites—and I’ll be completely honest with you: it takes a bit of planning and practice to really get it right. But once you do? Your life is forever changed. Suddenly you have one of the most luscious desserts tucked in your back pocket.
I would never have attempted a recipe like this if it hadn’t come from Sally McKenney of Sally’s Baking Addiction. I’ve been baking alongside her for over a decade. So much of what I know—those tiny nuances that take a baked good from “really good” to “truly extraordinary”—I learned through her blog. She made food science approachable and easy understand. This cake is the perfect example of why those extra, intentional steps are worth taking when you want to share something unforgettable.
I did make a single change to Sally’s original recipe: I reduced the sugar in the cake layers. That can be risky, since sugar affects moisture, but I always test carefully and only cut back when I know the other flavors will shine brighter because of it. And trust me—this cake starts out incredibly moist. Plus, we’re layering it with a soft mousse, which acts like a protective barrier that keeps the cake tender for days.
I also followed Sally’s notes closely. Instead of hot water, I used a strong cup of freshly brewed coffee to deepen the chocolate flavor. I used a blend of Dutch-processed and natural cocoa powders where recommended, added espresso powder to the dry ingredients, and used Dutch-processed cocoa again for the mousse to make it extra rich. The result is a true chocolate-lover’s dream.

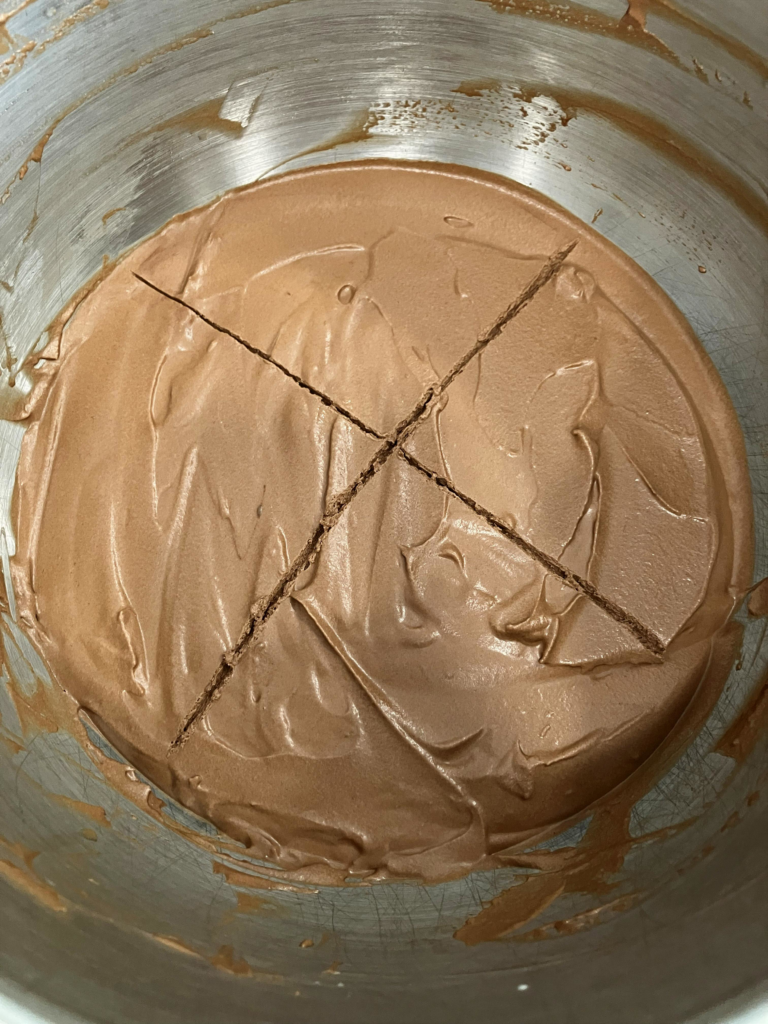
Left: mousse after chilling overnight
Right: sectioned into quarters for a 4-layer cake (see notes below)
Speaking of the mousse—it’s almost foolproof, but it can be overmixed if you’re not paying attention. I love that it contains no eggs, making it perfect for beginners. No need to temper eggs, no stress. Just whip your heavy cream to medium peaks, fold it into the melted chocolate/bloomed cocoa mixture, and gently combine until no streaks remain. Then chill for at least 2 hours (or up to a full day) until set.
Because this recipe requires chilling time, I highly recommend reading through the entire recipe first and breaking the work into two days. The recipe itself is written in the order I suggest preparing it. Once assembled, the cake needs chill time too—making it a wonderful make-ahead dessert. You can serve it chilled or at room temperature. I love it both ways.
Can you pick up a chocolate mousse cake from the bakery? Sure.
Will it taste as good as this one? Probably not.
Most bakery mousse cakes are made far in advance. They stay moist, yes, but the flavors dull over time. You end up with something soft but oddly flavorless. This cake is rich and full of chocolate flavor. The delicate layers and soft mousse do take some practice to handle—especially on a warm day—but once you master the assembly, you’ll realize why this cake is worth the effort.
And soon enough, you’ll understand:
This cake can’t be bought. It can only be made—with care, attention, and lots of love.
Ingredient Breakdown
Cocoa Powder: I recommend using a combination of cocoa powders for a deep, rich chocolate flavor. Use natural cocoa powder if that is all you have.
Espresso Powder: Optional, but wonderful for enhancing chocolate flavor—it won’t make the cake taste like coffee. I like Cafe Bustelo but any instant espresso will work.
Hot Coffee: You can substitute with hot water, but if you have a coffee maker, the brewed coffee adds incredible depth to the chocolate flavor (just like the espresso powder).
Sour Cream: Full-fat only. You can substitute with full-fat plain Greek yogurt if needed.
Chocolate Baking Bars: I love Ghirardelli’s baking bars for both quality and accessibility—they’re pre-divided by ounce, which makes measuring effortless. I also use Callebaut chocolate blocks, and if you want to splurge, Valrhona feves are amazing. Whatever brand you choose, stick to semi-sweet (35–60% cocoa) and measure by weight.
Heavy Cream: This is what gives you a silky mousse without eggs. No tempering, no worries—just whip to the right consistency and fold gently.
Oil: Use a neutral oil such as vegetable, canola, or avocado. Oil-based cakes stay moist and tender. Avoid strongly flavored oils like olive oil.
Buttermilk: I don’t recommend substituting here—it adds irreplaceable moisture, tang, and structure to the cake.
Dark Chocolate Mousse Cake
Ingredients
Chocolate Mousse
- ½ cup hot water
- ¼ cup (22 grams) dutch-processed cocoa powder
- 8 oz. semi-sweet chocolate bars finely chopped
- 2 cups heavy cream cold
- 2 Tablespoons confectioner's sugar
- ½ teaspoon vanilla extract
Cake Layers
- 1¾ cups (220 grams) all-purpose flour
- ½ cup (43 grams) dutch-processed cocoa powder
- ¼ cups (22 grams) natural cocoa powder
- 1½ cups (323 grams) granulated sugar
- 2 teaspoons baking soda
- 1 teaspoon baking powder
- 1 teaspoon kosher salt
- 1 teaspoons espresso powder
- 2 large eggs at room temperature
- ½ cup neutral oil avocado or canola
- ¾ cup sour cream at room temperature
- ½ cup buttermilk at room temperature
- 2 teaspoons vanilla extract
- ½ cup hot coffee
Chocolate Ganache
- 6 oz. semi-sweet chocolate finely chopped
- ¾ cup heavy cream
Instructions
Chocolate Mousse
- In a small bowl, whisk the hot water and cocoa powder together until smooth. Set it aside.
- Melt the chopped chocolate either in a double boiler or in the microwave in short bursts. Once it’s completely smooth, stir in the hot water/cocoa mixture with a rubber spatula. It should turn silky and glossy. Set it aside to cool.
- In the bowl of a stand mixer, add the heavy cream, confectioner’s sugar, and vanilla. Using the whisk attachment, whip on medium-high speed until medium peaks form.
- Pour the melted chocolate mixture into the bowl of whipped cream. Gently fold it together with a rubber spatula, making sure to scrape the bottom so everything gets incorporated. Stop as soon as the streaks disappear—overmixing will deflate the mousse.
- Cover the bowl with plastic wrap and refrigerate at least overnight so it can set.
Chocolate Cake Layers
- Grease three or four 8-inch cake pans and line the bottoms with parchment.
- In a medium bowl, whisk together the flour, cocoa powders, sugar, baking soda, baking powder, salt, and espresso powder. Set aside.
- Preheat your oven to 350°F.
- In a large bowl, whisk together the oil, eggs, sour cream, buttermilk, and vanilla.
- Add the dry ingredients to the wet ingredients, and as you whisk, slowly pour in the hot coffee. Mix until everything is just combined. The batter will be very thin.
- Divide the batter evenly between the pans and bake for 15–20 minutes, or until a toothpick comes out with just a few moist crumbs.
- Let the cakes cool completely on a rack before removing them from the pans.
Assembly
- Once the cakes are cooled, run a butter knife around the edges, flip them out, and peel off the parchment.
- Take the mousse out of the fridge and divide it into equal portions—three if you baked three layers, four if you baked four layers.
- Place a small dollop of mousse on your cake board or stand to keep the first layer in place. Set the first cake layer down and spread one portion of mousse evenly over the top with an offset spatula. Repeat with the remaining layers, placing the final cake layer upside down so the top is nice and flat. If the mousse gets too soft while you build the cake, just pop everything into the fridge for a few minutes.
- Use the last portion of mousse to give the whole cake a thin crumb coat. Refrigerate while you prepare the ganache.
Chocolate Ganache
- Place the chopped chocolate in a heatproof bowl.
- Warm the heavy cream in a small saucepan until it just starts to simmer. As soon as it does, remove it from the heat and pour it over the chocolate. Let it sit for 2–3 minutes, then stir until smooth. Let the ganache cool slightly to room temperature, but don’t let it firm up., about 15 minutes.
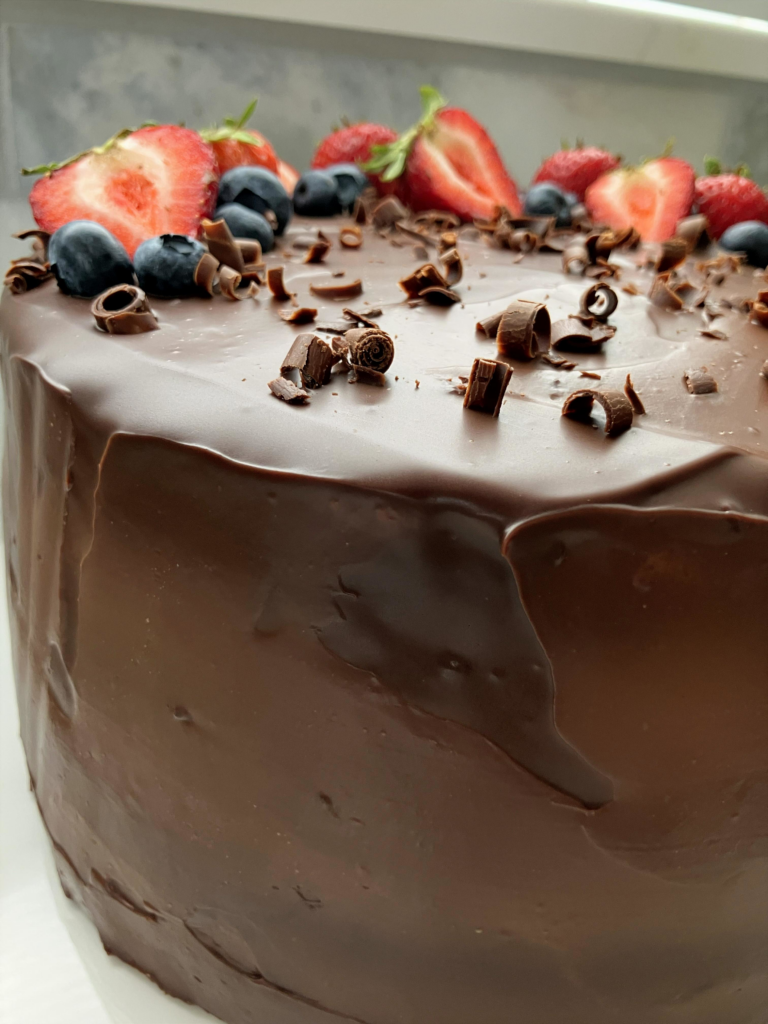
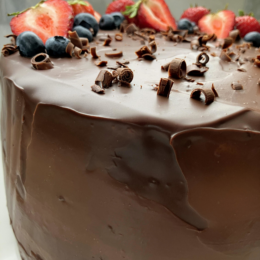
- Remove the cake from the fridge and pour the ganache over the top. Work fairly quickly to smooth it out and create drips down the sides if you like a rustic look. For a neater finish, use a bench scraper or icing spatula to smooth the sides. Add berries or chocolate shavings on top if you’d like.
- Refrigerate the cake for at least 6 hours before slicing. You can serve it chilled straight from the fridge or let it warm up for about 30 minutes for a softer texture.
Notes
- Read the recipe before you start so you can plan around the chill times. It’s written in the order I recommend making each component.
- Make the mousse the day before if you can—it needs several hours to set.
- Room-temperature ingredients really matter here. Sour cream and buttermilk need time to warm up. If you forget about the eggs, you can place them in warm water for a few minutes.
- If this is your first time, use three 8-inch pans instead of four. Four layers are gorgeous, but they’re thinner and trickier to stack until you get the hang of it.
- Only the mousse requires the mixer. When you're done whipping the cream, just pop the mixer bowl into the fridge until you're ready to assemble.
- Finely chopped chocolate melts faster and smoother—worth the extra effort.
- Use good-quality baking chocolate. Skip chocolate chips; they don’t melt well because of their stabilizers.
- The cake layers can be made ahead. Wrap cooled layers tightly in plastic, place in a zip-top bag, and refrigerate for 1 day or freeze for up to a month. Cold layers are actually easier to stack. Avoid leveling these cakes—they’re super soft and may crumble.
- If stacking gets messy or your mousse starts softening, just stop and chill everything. Cooler mousse = better structure. A bench scraper makes straightening the sides easy once you’re back at it.
- If you want the cake to stay fresh longer—or you’re making it for a special event—coat the whole thing in ganache. It locks in the moisture beautifully. A simple drip is fine too if you prefer less fuss.
- Keep the cake refrigerated until about 30 minutes before serving.
- Add toppings (berries are my favorite) right after smoothing the ganache. Once the ganache sets, toppings won’t stick well. This cake is rich, so the tartness of fresh berries really balances it.